JavaScript-面向对象编程

原型

对于大多数语言,面向对象编程都是通过实例来实现.但是在JS中,它不区分类和实例,而是通过原型(prototype)来实现面向对象编程.

举个例子来说明一下原型:

假设我们想创建xiaoming这个具体的学生,但是我们没有Student类型可以用,不过有一个现成的对象

1
2
3
4
5
6
7
let robot = {
name: 'Robot',
height: 1.6,
run: function () {
console.log(this.name + ' is running...');
}
};

这个robot对象有名字,有身高还会跑,有点像xiaoming,于是就是用它来创建xiaoming吧.直接把它改名为Student,然后创建出xiaoming

1
2
3
4
5
6
7
8
9
10
11
12
13
14
15
let Student = {
name: 'Robot',
height: 1.2,
run: function () {
console.log(this.name + ' is running...');
}
};

let xiaoming = {
name: 'xiaoming'
};
// 这里把xiaoming的原型指向了Student,看上去xiaoming仿佛是从Student继承下来
xiaoming.__proto__ = Student;
xiaoming.name; // 'xiaoming'
xiaoming.run(); // xiaoming is running...

JS的原型链没有class的概念,所有对象都是实例,所谓的继承关系就是一个对象的原型指向另一个对象.
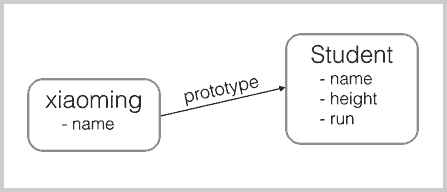
xiaoming-prototype

比如如果你把xiaoming的原型指向其他对象:

1
2
3
4
5
6
7
8
let Bird = {
fly: function () {
console.log(this.name + ' is filying...');
}
};
xiaoming.__proto__ = Bird;

xiaoming.fly(); // 现在xiaoming已经无法run了,只能fly

**注意:**上面的__proto__只是为了演示而已,实际开发不要直接用obj.__proto__去改变一个对象的原型

object.create()可以传入一个原型对象,并创建一个基于该原型的新对象,但是新对象什么属性都没有.因此我们可以写个函数来创建xiaoming

1
2
3
4
5
6
7
8
9
10
11
12
13
14
15
16
17
18
19
20
// 原型对象
let Student = {
name: 'Robot',
height: 1.2,
run: function () {
console.log(this.name + ' is running...');
}
};

function createStudent(name) {
// 基于Student原型创建一个新对象
let s = Object.create(Student);
// 初始化新对象
s.name = name;
return s;
}

let xiaoming = createStudent('小明');
xiaoming.run(); // 小明 is running...
xiaoming.__proto__ === Student; // true

原型链

JS对每个创建的对象都会设置一个原型,指向它的原型对象.

当我们用obj.xxx访问一个对象的属性时,JS引擎会先在该对象上找对应的属性,没有找到就去它的原型对象上找,还没有找到,就一直上溯到object.prototype对象,都没找到,就返回undefined

例如一个array对象

1
let arr = [1, 2, 3];

这就是它的原型链

1
2
3
4
5
6
7
8
9
10
11
12
13
14
15
16
       null


┌─────────────────┐
Object.prototype
└─────────────────┘


┌─────────────────┐
Array.prototype
└─────────────────┘


┌─────────────────┐
│ arr │
└─────────────────┘

Array.prototype定义了indexOf(),shift()等方法,因此你可以在所有Array对象上直接调用这些方法.

当我们创建一个函数,函数也是对象.

1
2
3
4
5
6
7
8
9
10
11
12
13
14
15
16
17
18
19
20
function foo () {
return 0;
}

null


┌───────────────────┐
Object.prototype
└───────────────────┘


┌───────────────────┐
Function.prototype
└───────────────────┘


┌───────────────────┐
│ foo │
└───────────────────┘

Function.prototype定义了apply()等方法,所以所有函数都能调用这些方法.

创建对象

object.create()

如上所示.这种方法允许你创建一个新对象,并将现有对象作为其原型.这意味着新对象将继承现有对象的属性和方法.

字面量

最简单,最常用.就是直接使用{...}

1
2
3
4
5
6
7
8
9
10
const myObject = {
name: 'John',
age: 30,
greet: function () {
console.log("Hello " + this.name);
}
};

console.log(myObject.name); // 输出: John Doe
myObject.greet(); // 输出: Hello John Doe

new Object()

不太常用,主要用于创建一个空对象,然后动态地添加属性

1
2
3
4
5
const myObject = new Object();
myObject.name = 'Peter';
myObject.age = 25;

console.log(myObject.name); // 输出: Peter

构造函数

这种方法允许你创建多个具有相同属性和方法的对象.构造函数使用this引用新创建的对象.

1
2
3
4
5
6
7
8
9
10
11
12
function Person(name, age) {
this.name = name;
this.age = age;
this.greet = function() {
console.log('hi, ' + this.name);
};
}

const person1 = new Person('Peter Pan', 20);
const person2 = new Person('WeiJian', 18);
person1.greet();
person2.greet();
  • new关键字把构造函数内的this绑定到对应的新对象上.
  • 构造函数默认返回this,也就是不用写return this

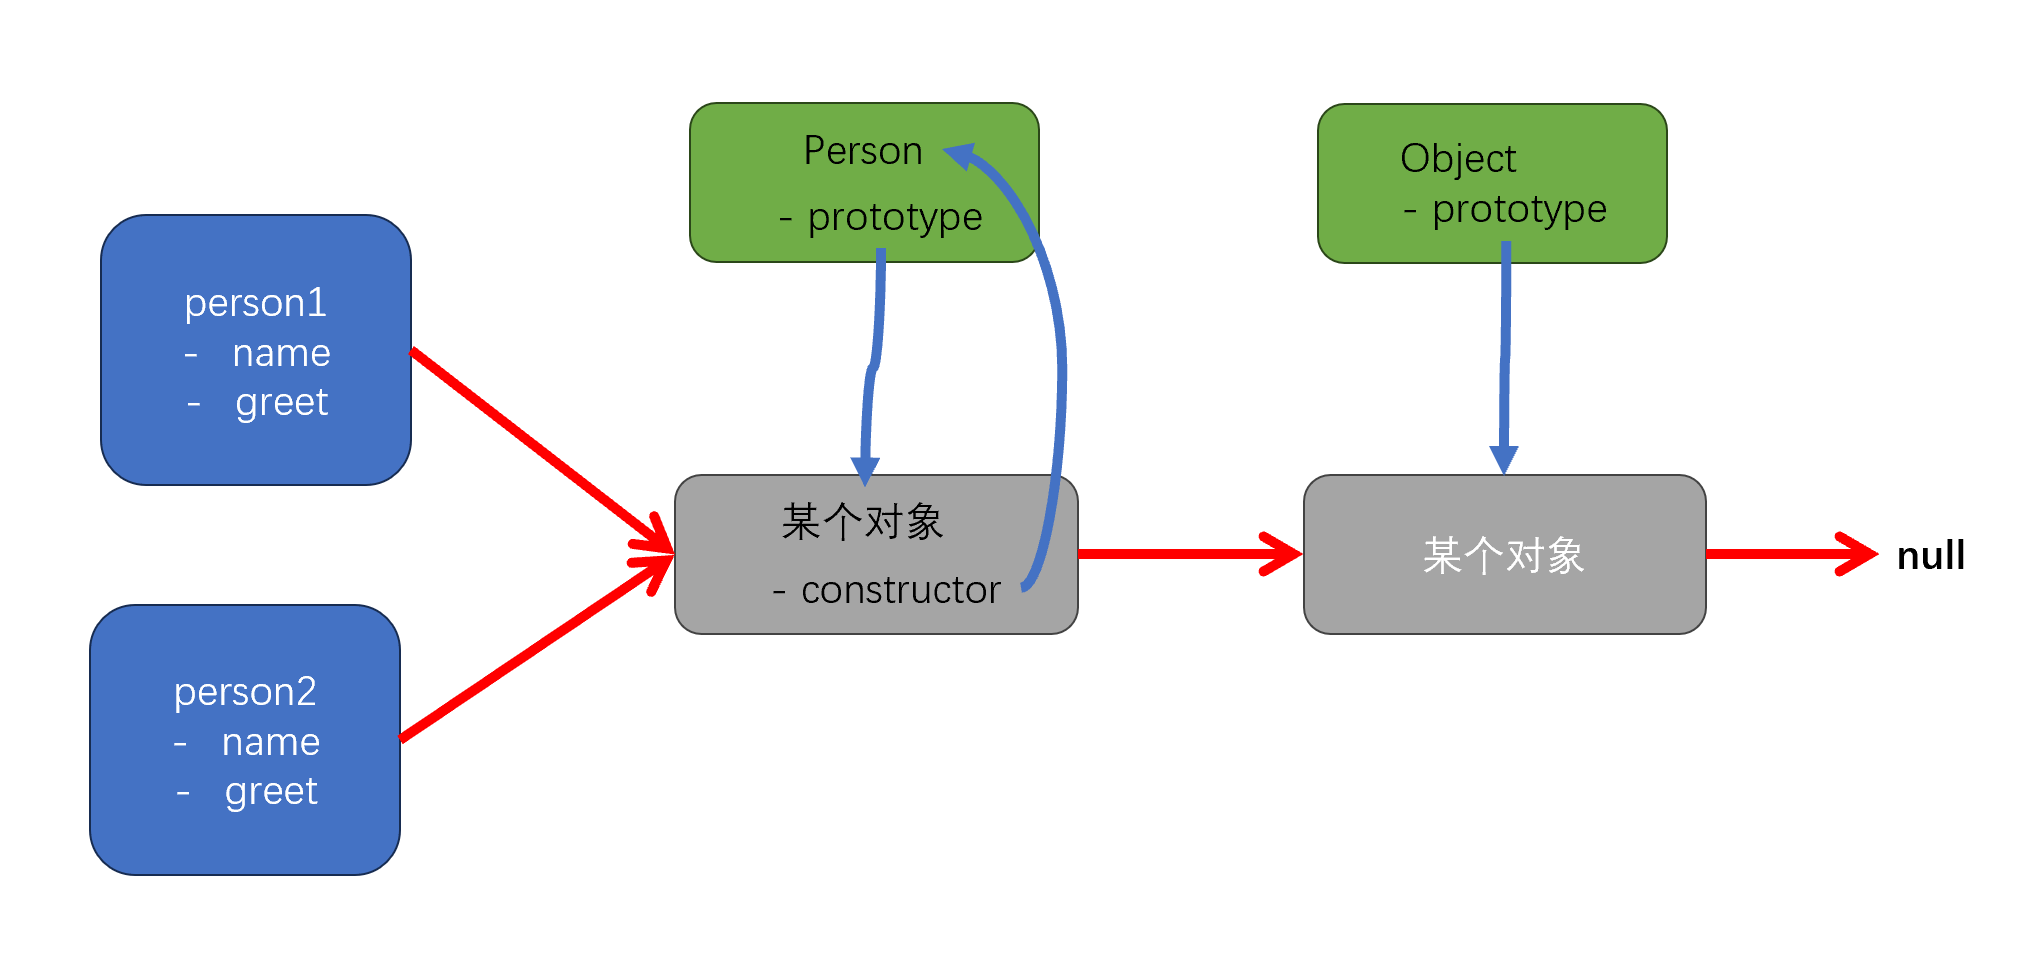
原型链是这样的:

person1的原型指向函数Person的原型

1
2
3
4
5
6
7
8
9
10
11
12
13
14
15
16
              null


┌─────────────────┐
Object.prototype
└─────────────────┘


┌─────────────────┐
Person.prototype
└─────────────────┘
▲ ▲ ▲
│ │ │
┌─────────┐┌─────────┐┌─────────┐
│person1 ││person2 ││ ... │
└─────────┘└─────────┘└─────────┘

使用new <构造函数>创建的对象还会从原型上获取一个constructor属性,指向<构造函数>本身.

1
2
3
4
person1.constructor === Person.prototype.constructor; // true
Person.prototype.constructor === Person; // true
Object.getPrototypeOf(person1) === Person.prototype; // true
person1 instanceof Person; // true

image-20241113114617900

  • 红色箭头是原型链
  • Person.prototype指向的就是person1person2原型对象
  • 这个原型对象自己有个constructor的属性,指向Person构造函数本身
  • 另外person1,person2是没有prototype属性的,不过可以用__proto__这个非标准用法来查看
  • 此时我们就认为person1,person2“继承”自Person

另外还有一个小问题:

1
2
person1.name === person2.name; // false
person1.greet === person2.greet; // false

新创建的对象,属性不相等是正常的,但是他们的方法也是不相等的.也就是说它们各自会有各自的方法,几时方法的名字和代码都一样.

但是这样子同样的方法存两份有点浪费资源了,所以我们可以在共享对象上创建这个方法,然后继承它的对象就会使用同一个方法.

1
2
3
4
5
6
7
function Person(name) {
this.name = name;
}

Person.prototype.greet = function () {
console.log('hi, ' + this.name);
};

如果一个函数被定义为用于创建对象的构造函数,但是调用时忘记写new:

  • strict模式下,this.name = name会报错,因为this绑定为undefined
  • strict模式下,this.name = name不会报错,因为this绑定为window,无意间创建了全局变量name,并返回undefined

所以调用构造函数千万不要忘记了new.一些语法检查工具可以帮助你检查你的语法,比如jslint

但其实new可以通过函数封装,一个常用的编程模式像这样:

1
2
3
4
5
6
7
8
9
10
11
12
13
14
15
16
17
18
19
20
// 定义构造函数
function Student(props) {
this.name = props.name || '匿名';
this.grade = props.grade || 1;
}

// 在原型对象上加函数,以后创建新对象自动继承
Student.prototype.hello = function () {
alert('Hello, ' + this.name + '!');
};

// 通过一个函数封装new操作
function createStudent(props) {
return new Student(props || {});
}

// 调用时就不怕漏掉new,参数也灵活,传不传都可以
let xiaoming = createStudent({
name: '小明'
});

类语法

ES后引入创建对象的语法,以后会提及.


目前字面量和类语法最常用.

构造函数的缺点是其原型链的设置方式容易出错,而且没有类语法清晰

Object.create()主要用于精确控制原型链的场景,或者需要创建不带构造函数的对象

模拟继承

在传统基于Class的语言如Java,C++中,继承的本质是扩展一个已有的class,并生成新的Subclass.由于这类语言严格区分类和实例,继承实际上类型的扩展.

但是JS采用原型继承,所以无法直接扩展一个Class,因为根本没有Class这个概念.

那如果想要继承扩展呢?

1
2
3
4
5
6
7
8
9
10
11
12
13
// 假设有这么一个Student的构造函数
function Student(props) {
this.name = props.name || 'Unnamed';
}

// 在Student的原型中添加一个hello的共享方法
Student.prototype.hello = function() {
alert('Hello, ' + this.name + '!');
};

// 创建两个新对象
let xiaoming = new Student('小明');
let xiaohong = new Student('小红');

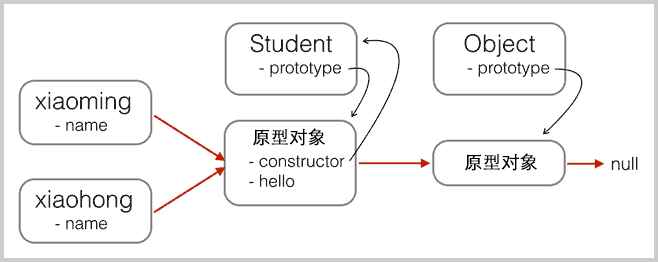
原型链如下:

js-proto

此时如果想要基于Student扩展出PrimaryStudent

1
2
3
4
5
function PrimaryStudent(props) {
// call 允许你调用一个函数,并指定函数内部"this"的值以及传递给函数的参数
Student.call(this, props);
this.grade = props.grade
}

在这个例子中,Student.call(this, props)做了以下事情:

  1. 调用 Student 函数: 它像普通函数一样调用了 Student 构造函数。
  2. 设置 this 的值: call() 的第一个参数指定了 Student 函数内部 this 的值。 在这里,this 指的是正在被创建的 PrimaryStudent 实例。 这很重要,因为在 Student 构造函数内部,this.name = props.name || 'Unnamed'; 这行代码会将 name 属性添加到 this 指向的对象上。 通过将 this 设置为 PrimaryStudent 的实例,我们确保 name 属性被添加到 PrimaryStudent 实例上,而不是其他地方。
  3. 传递参数: call() 的第二个参数 props 将被传递给 Student 函数。 这使得 Student 构造函数可以使用 props 对象来初始化 PrimaryStudent 实例的 name 属性

这个做法可以理解为:

PrimaryStudent构造函数内部手动调用Student构造函数,并将其this指向了PrimaryStudent的实例.这样模拟了Student构造函数被用于创建PrimaryStudent实例的效果,模拟”继承”.

但实际上这并不是真正意义上的继承.举这个例子只是为了扩展,实际中并不会这么操作.

来源

但我看不懂他下面的解释,只摘录这个例子,后面的理解找的AI.

原型继承

JavaScript继承的核心是原型链.每个对象都有一个__proto__属性.(现代浏览器中一般通过Object.getPrototypeOf()来访问),它指向创建该对象的函数prototype属性.当访问对象的某个属性时,JS引擎会现在对象自身查找,如果没有找到,就会沿着原型链向上查找,知道找到该属性或到达原型链顶端(null).

__proto__VS prototype

prototype(原型属性)

  • 是一个函数对象才拥有的属性.它指向原型对象.使用该函数(构造函数)new出来的对象,它的__proto__属性会被设置为prototype的属性值

  • 一般用来定义通过构造函数创建的对象的共享属性方法.也就是说它充当新对象的模板.

    1
    2
    3
    4
    5
    6
    7
    8
    9
    10
    11
    12
    13
    14
    15
    function Person(name) {
    this.name = name;
    }

    Person.prototype.greet = function() {
    console.log('Hello, my name is ' + this.name);
    };

    const person1 = new Person('Alice');
    const person2 = new Person('Bob');

    person1.greet(); // Output: Hello, my name is Alice
    person2.greet(); // Output: Hello, my name is Bob

    console.log(person1.greet === person2.greet); // true, 不同实例共享同一个方法

    Person.prototypePerson构造函数的原型属性

__proto__(原型链)

  • 是一个对象拥有的属性(包括函数对象).它指向创建该对象的构造函数的prototype属性.是JS实现原型继承的关键.

  • 它用来构成JS的原型链.当访问一个对象属性的时候,JS引擎会现在对象自身找该属性,如果找不到,会沿着__proto__指向的原型对象继续查找,知道找到或者到尽头(null)为止.

  • 但现在我们一般不直接调用它,他是用Object.getPrototypeOf()来查看; Object.setPrototypeOf() 来设置对象的原型.

    1
    2
    3
    console.log(person1.__proto__ === Person.prototype); // Output: true
    console.log(person1.__proto__.greet === Person.prototype.greet); // Output: true
    console.log(Object.getPrototypeOf(person1) === Person.prototype); // Output: true (preferred way)

inherits

inherits函数的目标是建立两个构造函数之间的继承关系,使一个构造函数的实例能够继承另一个构造函数的原型上的属性和方法.

1
2
3
4
5
6
7
8
9
10
11
12
13
14
15
16
17
// 下面是一个inherits函数的模拟实现
function inherits(Child, Parent) {
// 1. 创建一个空函数
function F() {} // 临时构造函数,作为中介,避免直接修改Child或Parent的原型

// 2. 将F的原型设置为Parent的原型
F.prototype = Parent.prototype; // F与Parent共享同一个原型

// 3. 将Child的原型设置为F的一个新实例
Child.prototype = new F(); // Child继承Parent的原型,而且Child.prototype独立于Parent.prototype

// 4. 设置Child.prototype.constructor 回到Child
Child.prototype.constructor = Child; // 恢复Child的构造函数,因为步骤3修改了它

// 可选步骤: 添加__super__属性,非标准,但常用
Child.prototype.__super__ = Parent.prototype; // 方便在子类方法重调用父类方法
}

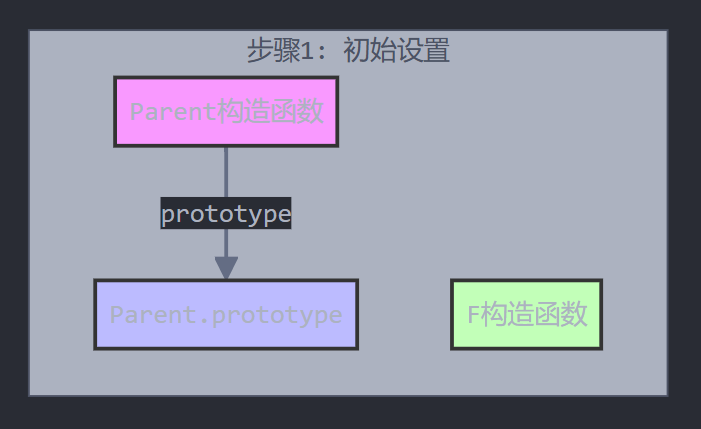
image-20241114175822002

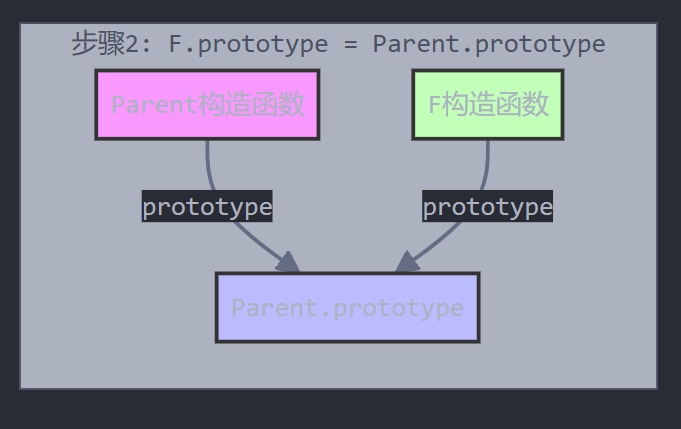
image-20241114175911981

此时FParent指向同一个原型对象

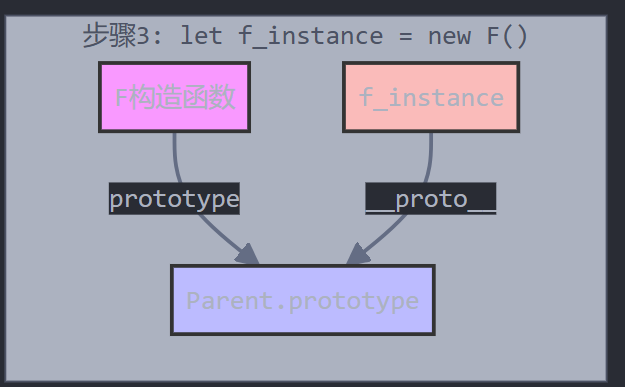
new F()

image-20241114180118730

通过F()构造函数创建的实例(f_instance),它的__proto__指向它的构造函数的prototype属性,也就是Fprototype属性,因为FParent指向同一个原型对象,所以f_instance的__proto__实际上也是指向Parent.prototype
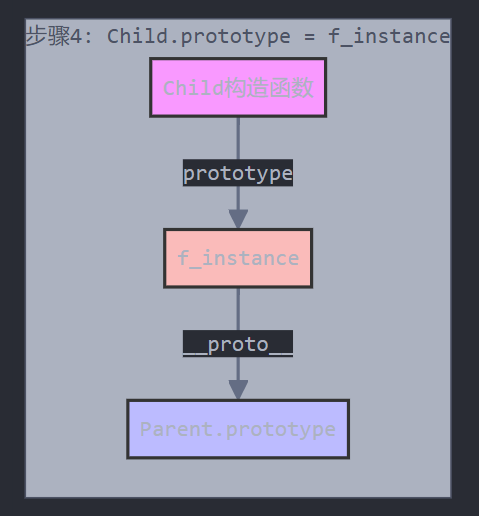
image-20241114181352180

此时把Child的prototype指向F构造函数创建的实例(f_instance),因为f_instance.__proto__指向Parent.prototype,此时Child和Parent就串起来了.

可是此时Child的prototype的constructor属性应该是F(),因为此时Child的prototype指向了f_instance,所以Child的prototype的constructor指向的是f_instance的构造函数,也就是F().

所以要修复回来,指回Child. Child.prototype.constructor = Child;
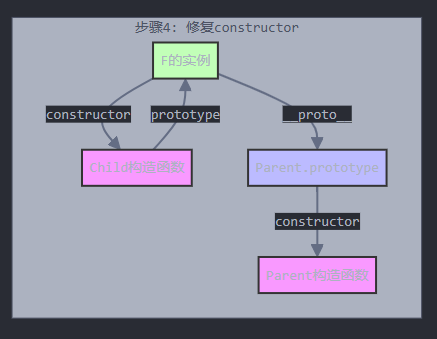
image-20241114182546123

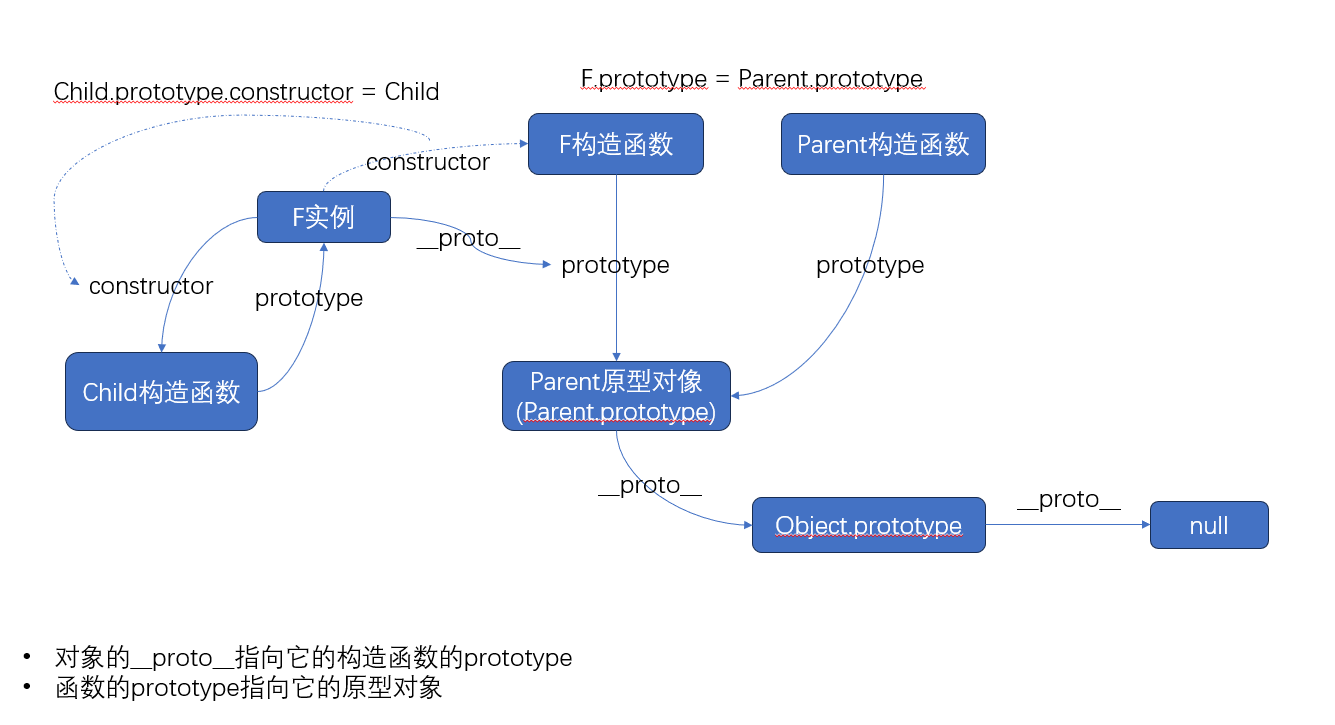
最终原型链大概是这样:

image-20241114184137787


真尼玛复杂….

我觉得大概理一下就行了,反正以后都是用ES6的class语法


以上复杂的动作可以用一个inherits()函数封装起来,隐藏F的定义,简化代码.

1
2
3
4
5
6
function inherits(Child, Parent) {
let F = function() {};
F.prototype = Parent.prototype;
Child.prototype = new F();
Child.prototype.constructor = Child;
}

然后调用这个inherits()函数就能简单实现原型链继承

1
2
3
4
5
6
7
8
9
10
11
12
13
14
15
16
17
18
function Student(props) {
this.name = props.name || 'Unnamed';
}

Student.prototype.hello = function() {
alert('Hello, ' + this.name + '!');
};

function PrimaryStudent(props) {
Student.call(this, props);
this.grade = props.grade || 1;
}

inherits(PrimaryStudent, Student);

PrimaryStudent.protype.getGrade = function() {
return this.grade;
};

Class

JS的对象模型基于原型实现,虽说它概念简单,没有类的概念.但是理解起来复杂,实现起来也麻烦.ES6引入了class这个语法糖,让类的定义更加简单.

1
2
3
4
5
6
7
8
9
10
11
12
13
14
15
16
17
18
19
20
21
22
23
// 函数方式实现Student类
function Student(name) {
this.name = name;
}

Student.prototype.hello = function() {
alert('Hello, ' + this.name + '!');
}

// class关键字实现Student类
class Student {
// 定义构造函数
constructor(name) {
this.name = name;
}
// 定义类中的方法
hello() {
alert('Hello, ' + this.name + '!');
}
}

let xiaoming = new Student('小明');
xiaoming.hello();

Class继承

直接通过extends实现

1
2
3
4
5
6
7
8
9
10
class PrimaryStudent extends Student {
constructor(name, grade) {
super(name); // 用super调用父类的构造方法
this.grade = grade;
}

myGrade() {
alert('I am at grade ' + this.grade);
}
}
  • class: 定义类
  • extends: 表示原型链对象来自Student
  • constructor: 定义子类的构造函数,子类需要namegrade两个参数,name用于super(name)中调用父类的构造函数,否则父类的name属性无法初始化

ES6引入的class只是一个语法糖,实际的底层原理跟上面的没有任何区别.我只能说…

舒服了….


JavaScript-面向对象编程
http://example.com/2024/11/12/js-oop/
作者
Peter Pan
发布于
2024年11月12日
许可协议